Thursday, August 6, 2015

Those Who Can't Do....Teach

  I am the daughter of a very talented painter. He is not a famous painter, in case you were wondering. However, as a little girl, I would watch him create magnificent paintings out of oil. Then I would look at my own paintings and they wouldn't be as good. So I stopped painting very early on. My father did everything he could to encourage me, but I just got it in my head that I wasn't going to reach his level of expertise so I would stop trying.

This summer, after guiding a hundred students and adults to completing their 3d printing projects of their own, I decided that I should embark on a project of my own. So starting in July, I began a design project in Sketchup. But crippled by fear and insecurity of art, I haven't been able to make much headway. If someone in the class decided to do the same project, I could teach them the tools to execute their designs. If I wanted to do something to show technique, I can get it done quickly. If I wanted to design something based on functionality, I could also do it quickly.  But for myself, I just can't seem to get it done. I am not sure why. I think it has something to do with that 7 year old girl thinking she will never be good as her father in art. 

I have confidence in my technical ability, but when it comes to the art aspect of 3d design, I just crumble. Which is part of the reason why I always stress painting . I want participants in 3d design to appreciate the artistic aspect of design. Even if I am still grappling with my fear of art (which is very real to some people.), 

Tuesday, August 4, 2015

New Technique


When I watch a YouTube video, I am not always able to follow all of the directions.  However, there is always something that I can learn from each video.  This video features a way to use the scale tool to bring in only one face of a 3D object that has just been push/pulled.  This creates a smooth angular appearance for your object.

Thursday, July 30, 2015

Different Kinds of Printers

So far, we have a Makerbot Replicator 2 and an XYZPrinting DaVinci Model 1.0. I went through my professional development wishing that I could know more about other brands of 3D printers.  It's not a Coke vs. Pepsi world out there.  There is a huge market for 3D printers and I need to learn about all of them. Challenge accepted.  Jennifer Feldman will learn about the different kinds of printers and post about them in the next year.

  However, I bought a book called 3DPrinting: Build Your Own 3D Printer and Print Your Own 3D Objects. By James Floyd Kelly.  I bought this book becausse I wanted to learn how to build my own 3D printer. What a waste of money.  The company he mentions doesn't even offer DIY kits anymore.  Also, who titles their book "build your own" and then only writes one chapter about it!? It should really be called "3D Printing: Briefly Discussing a 3D Printer DIY and Mostly Discussing Software." So I didn't get my money's worth that way.  I did, however, get get the names of two other 3D printing companies and a good chapter on TinkerCAD tutorials. Bah.

Monday, July 27, 2015

Cookie Cutter

One of the participants was very eager to design a cookie cutter based on the logo for the wedding.  Here it is!

Friday, July 24, 2015

3D Printing Made Easy School Technology Summit 2015

I am on livecubeapp talking about 3D printing!

nycschoolstech.livecubeapp.com


New Boxes

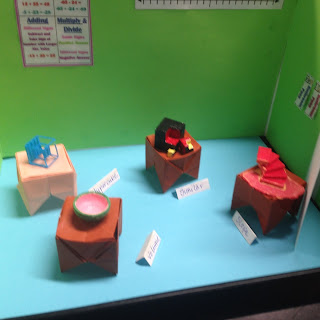
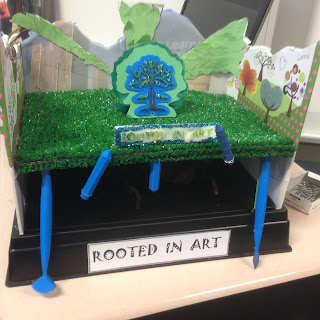
My preferred method of displaying 3D printed materials is through diorama boxes.  It gives teachers a chance to role-play what their students would do in class.  Here are some pictures to give you an example of what teachers would create for their classes. 

Check it out:
Transportation

3D Shapes 

Social Studies/Architecture

Games  

AP Calculus 

Archimedean Solids 

Periodic Table of Elements: Group 1 (to be continued)

 Pop/Video Game Culture

Interactive Tetrahedron Puzzle (to be continued)

Geometric Concepts 

Mapping a Wedding Reception

Native American History

Science Simple Machines

Soma Cubes (Version 1)

Art

History of Gaming

Beach Landscape

Tuesday, July 14, 2015

Waiting for Printing to End

Michele and I are in semester four of 3D printing overall, semester two of printing for adults.  We are getting better with design, we know how to troubleshoot and anticipate needs, the kids and adults are getting very creative with things they want to print. We even got another printer, the XYZprinting machine. So we have doubled the amount of printing, but the seminal problem still remains.

The problem?

Waiting for the printing to end.

Then printing something else.

Waiting for the printing to end.

Then printing something else.

Waiting for the printing to end.

The trouble with teaching 3D printing as a subject is filling the lag time that students have for printing.  Designing simple pieces that students can use to put together will not take long once students have learned how to use the software.  Waiting for printing is the slow process.

Saturday, May 30, 2015

Writing A Textbook

Michele and I are teaching the 3D printing course for adults again this summer.  I am starting to write a textbook about Sketchup.  I asked Jerick to make a list of things he learned in 3D printing over two years, and he made a list forty topics long.   It's gratifying to think that something we did helped shape the way a student learns.

Friday, April 10, 2015

Size Matters

Small designs are killing us.  It is very hard to get students to print things that will come out into 3 inch bubbles. Also, one team is designing items that are by nature quite small.  It presents a problem because the designs don't always print out so small.  The upside is that the printing gets done quickly.

Sunday, March 29, 2015

Metric Problems!

I encountered this problem quite heavily in teaching the adult course, but designs made in inches would automatically register in Makerware as millimeters. The problem this year is that designs in Sketchup that students make in inches need to be resized in Makerware. 
It presents a huge problem for pieces that need to be glued together. So I am going to have to actively show students that all designs must be laid out on paper with dimensions in metric form.

Friday, March 13, 2015

T-shirt designs

The t-shirt design competition was a success. The lesson started off with students learning about branding, logos, and name selection. The lesson started off with defining branding, talking about the importance of commercial art in today's economy, and looking at corporate logos and their hidden meanings, Hidden Meaning Logos. I selected three group leaders based on three students who worked hard on the art competition.

There were three parts to the assignment.
  1. Create a company name.
  2. Create a logo design and draw it on paper first.
  3. Draw both on a t-shirt.
There were three groups participating in the mini-challenge of the week. Each group chose company names and designs based on different criteria.  One group chose 4ADiamond, because they all were in fourth grade, had names that start with an A, and wanted to graphically represent something with four sides. Another group picked the name Checkmate, and used a check and a chesspiece in their logo. The third group wanted to create a name that would represent technology, data, and computers. So they chose "tecuter.  " Their design was a puppy holding a laptop, because of the word "cuter." So they brainstormed animals that were cute and decided on a puppy.

Two out of the three group leaders were shy girls, which gave them authority and the opportunity to come out of their shell. The third group, 4ADiamond, had three boys who knew each other on the same grade, so they didn't have the same issues with socialization and gender disparity. The girls who were the leaders of the other two groups had to be told that they were the decision makers.  This gave them some self-confidence and responsibility that they hadn't really experienced in school. 

After they made their t-shirts, the teams were eager to create their designs on Sketchup. Team Checkmate made a design by using the push/pull tool. Team 4ADiamond used text on a rhombus using the text tool and the polygon tool. Team Tecuter designed four different parts, to be glued together: the puppy head, laptop, arms, and legs.

Pictures to follow when they present next week!

Thursday, March 5, 2015

3D Printing Year 2

My co-teacher and I began the second year of teaching 3D printing for students. There are marked changes in the group this year.  I don't think the students knew exactly what to expect last year, but this years group are more excited because of last year.  Also, teaching after school on a Wednesday seems to be better than teaching on a Saturday because students are still in the learning zone.


This year, we have put more effort into group learning projects.  The students like working together and were enthusiastic about the projects. We did one project where students had to build a load-bearing standalone structure out of tape and Q-tips.  Students did another project where students had to use buttons to fill a shape on a paper.  Different buttons were given monetary values, and students could not exceed $100 worth of buttons to create their figures.

We did an individual project where students had to draw a picture from an object on sight, but many of the students didn't put as much effort into it.  That was quite disappointing, because some of the students who I know to be good artists showed very little on the page. Part of the competition is design, so I think we will have to revisit the idea that commercial art has value.  Perhaps a t-shirt designing competition is in order.